PicoCalc uLisp Machine
21st April 2025
This article describes how to build a self-contained Lisp computer based on the Clockwork Pi PicoCalc handheld computer:
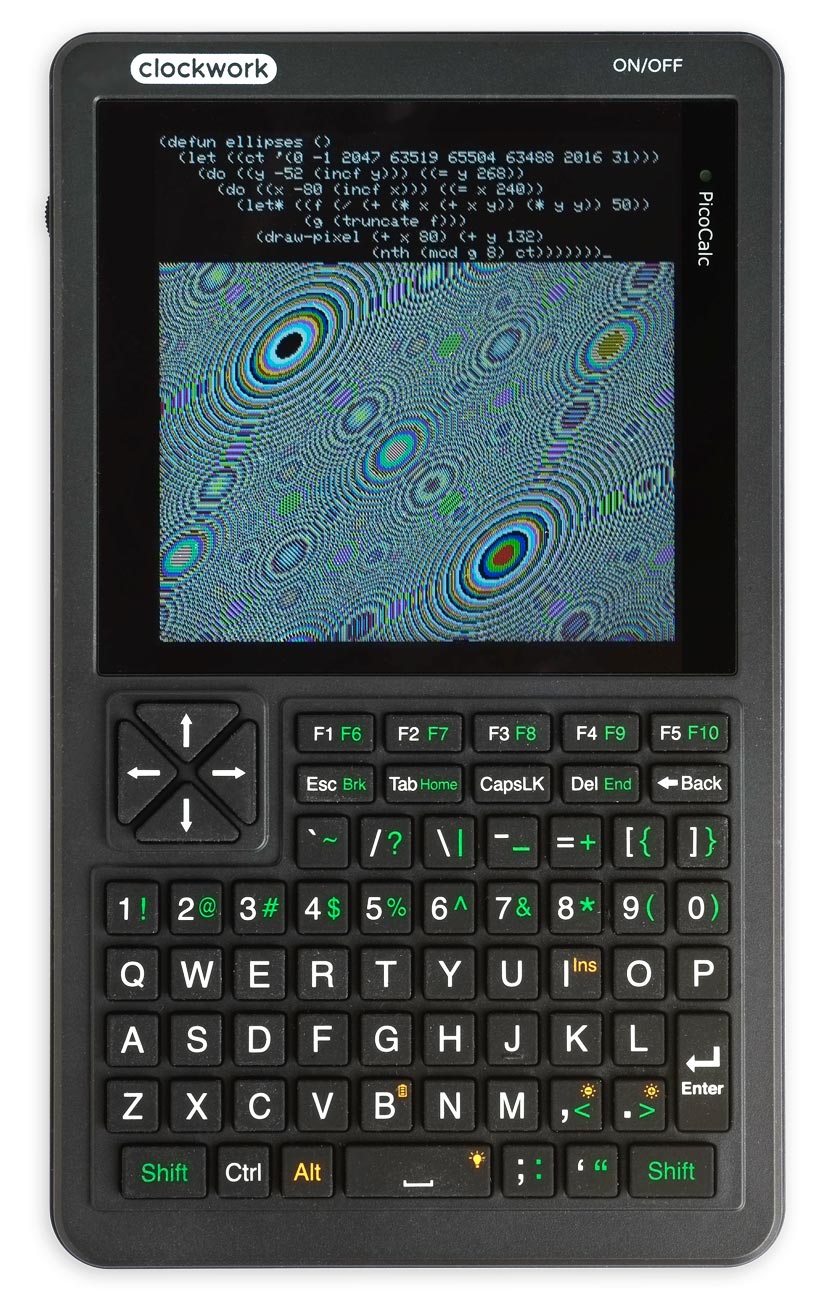
The PicoCalc from Clockwork Pi, which can form the basis for a handheld Lisp computer
with a self-contained keyboard and display.
It's available direct from Clockwork Pi in Hong Kong [1].
Introduction
The Clockwork Pi PicoCalc is a handheld computer is based on an RP2040-based Raspberry Pi Pico board, a RP2350-based Raspberry Pi Pico 2 board, or their Wi-Fi versions. The kit comes with a Raspberry Pi Pico, but you can swap this for one of the other boards, and they will all work with uLisp.
It has a 320x320 4" colour IPS display that gives a scrolling display of 32 lines of 53 characters, a backlit QWERTY keyboard, and an SD card socket. It's powered by one or optionally two 18650 rechargeable lithium batteries (not supplied), and these can be charged via its USB-C port.
Assembly
The PicoCalc comes as a kit that requires a small amount of assembly, but this is purely mechanical; no soldering is required.
The whole kit is very well packaged, in a cardboard box with the components in vacuum-formed trays:
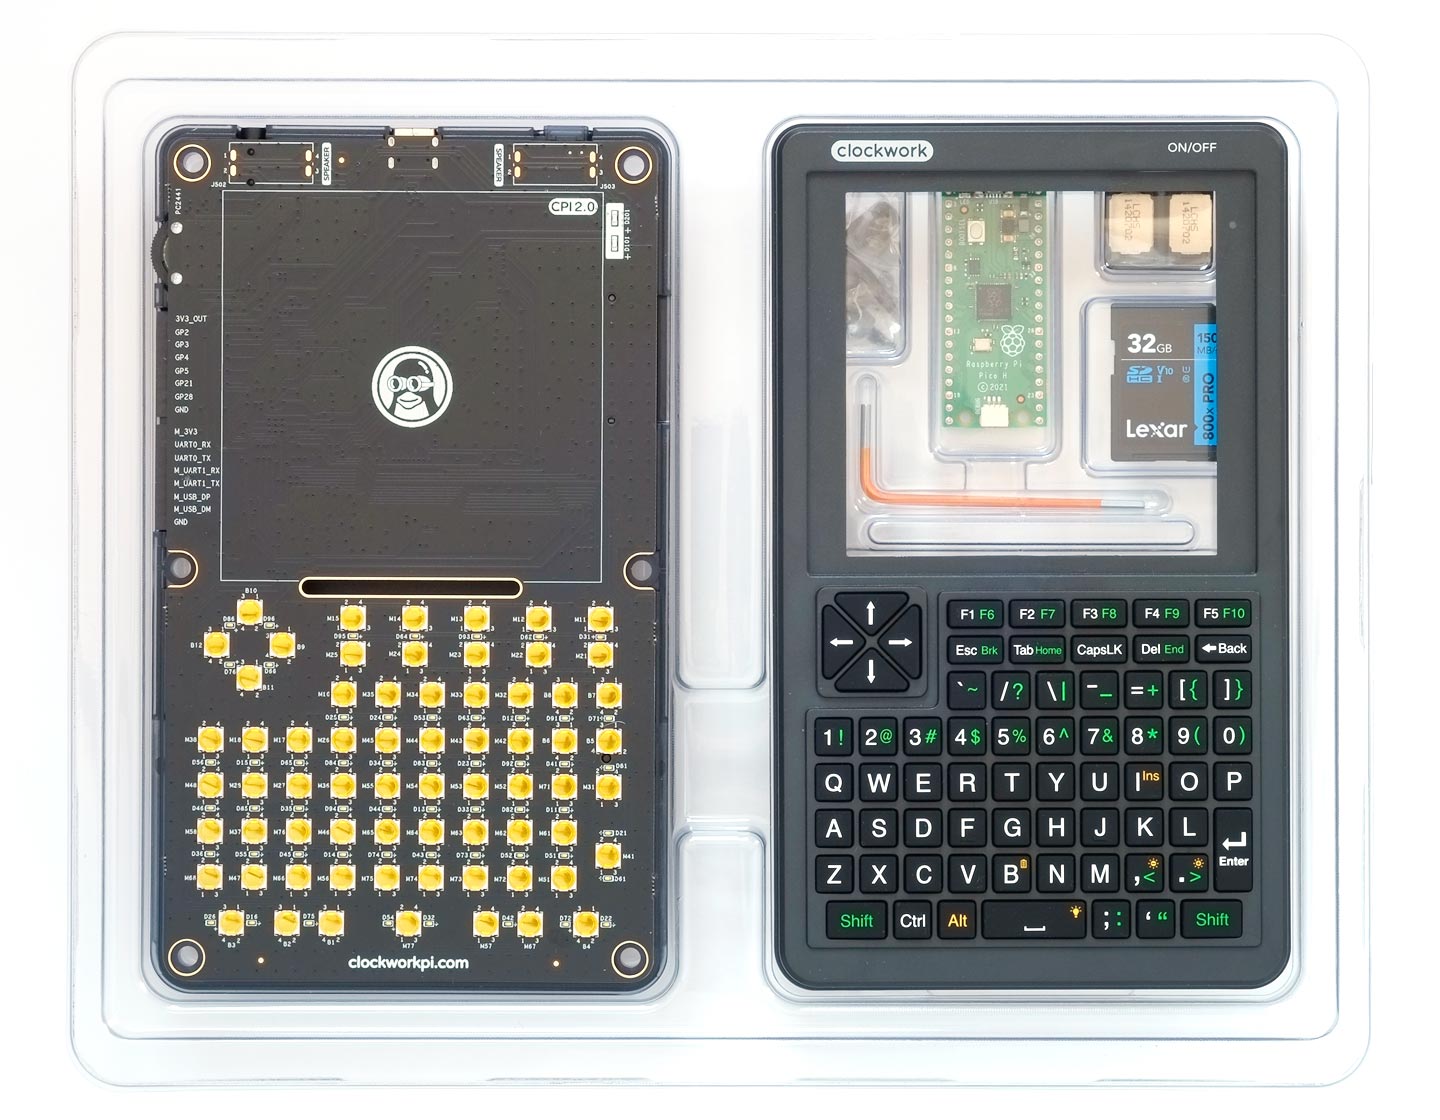
There's a nicely illustrated printed booklet giving the assembly instructions in clear English; for example:
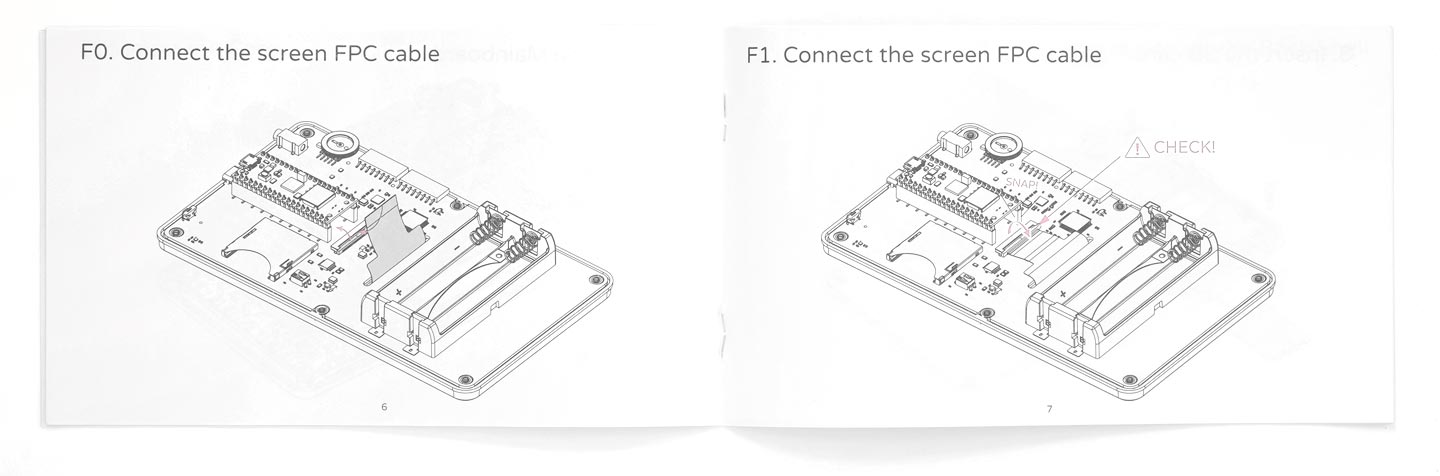
It took me about 15 minutes to complete the assembly.
Once you have completed the assembly the PicoCalc will boot up into the BASIC programming language.
Installing the PicoCalc uLisp firmware
The simplest way to install uLisp for the Raspberry Pi Pico supplied with the PicoCalc is to copy a uLisp UF2-format compiled image onto the Raspberry Pi Pico UF2 disk, as follows:
- If necessary, turn off PicoCalc by holding down the ON/OFF button for one second.
- Hold down the Raspberry Pi Pico BOOT button by inserting something like a toothpick through the slots on the back of the PicoCalc at the point marked reset.
- While keeping the button held down, connect the Raspberry Pi Pico board micro-USB socket to the computer's USB port, then release it.
The UF2 disk should be mounted on your computer; it will have a name like RPI-RP2.
- Download the uLisp UF2-format compiled image ulisp-picocalc.uf2 from:
https://github.com/technoblogy/ulisp-picocalc
- Drag it onto the mounted UF2 disk.
The file will be copied to the disk, which will then be ejected.
- Hold down the PicoCalc power button for one second.
You should then see the uLisp prompt on the PicoCalc display, and be able to enter Lisp programs at the keyboard. See Using the PicoCalc Lisp Machine below.
Compiling and uploading uLisp
If you want to customise your copy of uLisp, or you want to use a different board in the PicoCalc, you can compile uLisp from the source together with the necessary libraries, and then install it on the PicoCalc.
The following instructions describe how to do this using the Arduino IDE (I used Arduino 1.8.19 on a Mac). These instructions are based on How to compile uLisp on the PicoCalc GitHub repository.
The instructions assume you are using the Raspberry Pi Pico supplied with the PicoCalc; modify them as appropriate if you have swapped to one of the other compatible boards.
Install the Raspberry Pi Pico/RP2040 core
- Add the following URL to the Additional Boards Manager URLs list in the Arduino IDE Preferences dialog box:
https://github.com/earlephilhower/arduino-pico/releases/download/global/package_rp2040_index.json
- In the Arduino IDE search for the Raspberry Pi Pico/RP2040 core in Boards Manager and install it.
I tested this with core version 4.5.0 which uses the new certified 200 Mhz clock for the RP2040.
Install TFT_eSPI
- In the Arduino IDE search for the Bodmer TFT_eSPI library in Library Manager and install it. I used version 2.5.34.
You then need to patch TFT_eSPI for use with PicoCalc:
- Download the custom setup file Setup60_RP2040_ILI9488.h from:
https://github.com/technoblogy/ulisp-picocalc
- Add it to the TFT_eSPI User_Setups folder in libraries.
- Open the TFT_eSPI folder in libraries and locate the file User_Setup_Select.h.
-
Comment out the include for User_Setup.h and add an extra include for Setup60_RP2040_ILI9488.h so the two lines look like this:
// #include <User_Setup.h>           // Default setup is root library folder
#include <User_Setups/Setup60_RP2040_ILI9488.h>
Install the PicoCalc Keyboard library
The PicoCalc keyboard is implemented using a separate STM32 processor, and interfaces to the main processor via I2C. It requires a dedicated library which should be installed in the Arduino libraries folder:
- Execute the following GitHub commands in a terminal:
cd ~/Documents/Arduino/libraries
git clone https://github.com/cuu/arduino_picocalc_kbd.git
This will add the folder arduino_picocalc_kbd in the libraries folder.
Download the PicoCalc version of uLisp
- Download the PicoCalc uLisp source file ulisp-picocalc.ino from:
https://github.com/technoblogy/ulisp-picocalc
- Connect the Raspberry Pi Pico board micro-USB socket to the computer's USB port.
- Select Raspberry Pi RP2040 Boards from the Board menu, and the appropriate board from the submenu.
- Set Flash Size to the option that gives FS: 1MB. On the Raspberry Pi Pico this is 2MB (Sketch: 1MB, FS: 1MB).
This allocates enough space for use by LittleFS to save the entire workspace with save-image.
You can leave all the other options at their defaults.
Upload uLisp
- Select the board's USB port from the Port menu
- Upload uLisp to the board.
- Ignore the warning from TFT_eSPI:
#warning >>>>------>> TOUCH_CS pin not defined
Run uLisp
- Hold down the PicoCalc power button for one second.
You should then see the uLisp prompt on the PicoCalc display, and be able to enter Lisp programs at the keyboard.
Using the PicoCalc Lisp Machine
Entering programs
You can enter commands and programs by typing them at the keyboard, and pressing ↩. A keyboard buffer is provided that buffers a full screen of text, and you can use the ⌫ key to delete characters and correct typing mistakes.
The line editor includes parenthesis matching which automatically highlights matching brackets in green as you type in a program. This makes it much easier to enter a program correctly, and is especially helpful in telling you how many closing brackets to type at the end of defining a function.
Keyboard
To get upper-case letters, or the symbols in green, hold down one of the two Shift keys while typing a key.
Hold down Alt and press < or > to adjust the display brightness.
Hold down Alt and press the spacebar to adjust the keyboard backlight.
Escape
To escape from a running program press the Esc button on the PicoCalc keyboard, or type a ~.
Autocomplete
The autocomplete feature saves you typing by letting you enter a built-in keyword by typing just the first few characters followed by Tab.
The keyword will be completed with one of the uLisp built-in symbols. If there are several keywords starting with what you typed, pressing Tab cycles between them.
If you have loaded a uLisp Extensions File, autocomplete will include any symbols you have defined in your extensions.
Copying the last line
Press Shift-Enter to echo the previous line typed after the uLisp prompt, allowing you to edit it (this was previously on tab).
Connecting to a computer
You can connect the PicoCalc to a computer via a USB cable and use the Serial Monitor in the Arduino IDE to enter and edit programs as described in Using uLisp.
By default uLisp uses Serial1, which corresponds to the PicoCalc USB-C port, so you need to connect the USB-C port to a computer via a USB-C cable. The advantage of connecting via the USB-C port is that your battery will be charged at the same time.
Alternatively, if you prefer to use the Serial Monitor by connecting the Raspberry Pi Pico micro USB port to the computer, compile and upload uLisp after commenting out this line as shown:
// #define Serial Serial1
Sound
You can play notes through the internal speakers using the uLisp note function. For example, the following function plays a scale of C (the pin number is ignored):
(defun scale ()
  (mapc
   (lambda (n) (note 0 n 4) (delay 500))
   '(0 2 4 5 7 9 11 12))
  (note))
The beep character beeps the speaker:
(write-byte 7)
SD Card
The Cardputer has an SD card socket that can be used to read from and write to SD cards from uLisp, and to save an image of the Lisp workspace with (save-image). To return a list of the files on an SD card give the command directory:
> (directory)
("ULISP.IMG" "Cards.gif" "flags32.gif")
For details of using SD cards see SD card interface.
If you don't want to use SD cards, upload the firmware with the following line commented out:
// #define sdcardsupport
The (save-image) command will then use the flash memory to save the workspace.
Graphics
You can draw graphics with the full range of graphics extensions; for example:
(defun ellipses ()
  (let ((ct '(0 -1 2047 63519 65504 63488 2016 31)))
    (do ((y -52 (1+ y))) ((= y 268))
      (do ((x -80 (1+ x))) ((= x 240))
        (let* ((f (/ (+ (* x (+ x y)) (* y y)) 50))
               (g (truncate f)))
          (draw-pixel (+ x 80) (+ y 132)
                      (nth (mod g 8) ct))))))
  (get-key))
which produces the graphic shown in the photograph at the start of this page. See Graphics extensions for details.
PicoCalc extensions
The PicoCalc version of uLisp includes the following extensions to take advantage of features of the PicoCalc:
Reading a key
The function get-key waits for a keypress, and then returns the corresponding character.
It is also useful if you want to wait for a keypress after displaying graphics on the display, and don't want it overwritten by the text output.
Reading a pixel
The function read-pixel reads a pixel from the screen at coordinates (x, y):
(read-pixel x y)
It returns the 5-6-5 colour value.
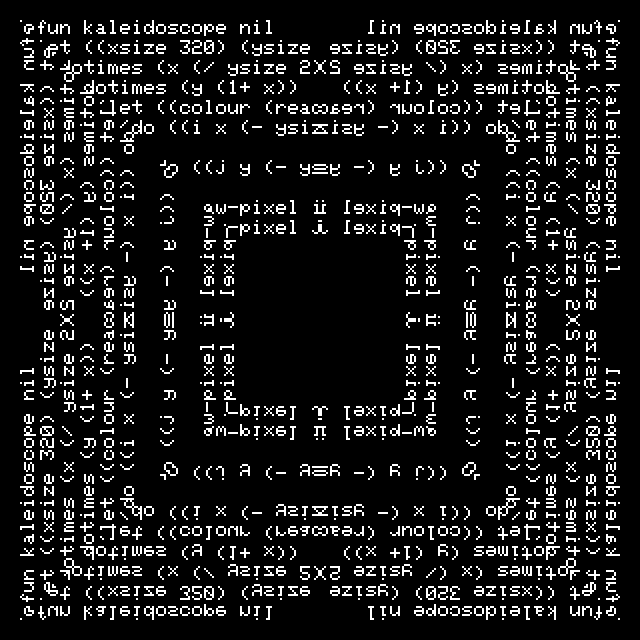
For example, the following kaleidoscope function takes a triangular section of the image on the screen, and reflects it through horizontal, vertical, and diagonal lines to create a symmetrical image, like a kaleidoscope:
(defun kaleidoscope ()
  (let ((xsize 320)
        (ysize 320))
    (dotimes (x (/ ysize 2))
      (dotimes (y (1+ x))
        (let ((colour (read-pixel x y)))
          (do ((i x (- ysize x 1)) (m 0 (1+ m)))
              ((>= m 2))
            (do ((j y (- ysize y 1)) (n 0 (1+ n)))
                ((>= n 2))
              (draw-pixel i j colour)
              (draw-pixel j i colour))))))))
Here's the result of running it on a listing of itself, and then saving the screen as a BMP file using save-bmp:
Saving an image of the screen
The function save-bmp saves a copy of the screen as a BMP format image file to the SD card with the specified filename:
(save-bmp filename)
Advanced options
ARM assembler
The ARM version of uLisp includes an ARM assembler that allows you to generate machine-code functions, integrated with Lisp, written in ARM thumb code. The assembler itself is written in Lisp to make it easy to extend it or add new instructions. For more information see ARM assembler overview.
Programming the RP2040 and RP2350 registers
For details of directly programming the RP2040/RP2350 registers from uLisp see Programming ARM registers.
Resources
The uLisp PicoCalc source and firmware on GitHub: https://github.com/technoblogy/ulisp-picocalc.
Updates
25th April 2025: Includes details of the improvements made to Release 4.7c, including: Copying the last line, Sound, Reading a pixel, and Saving an image of the screen.
28th April 2025: Describes the autocomplete feature added in Release 4.7d. Note that Copying the last line has been moved to Shift-Enter because Tab is the traditional key for autocomplete.
Acknowledgements
This firmware builds on the original port of uLisp to the PicoCalc by Clockwork Pi, and I'm grateful for help by @picolisper in porting the latest version of uLisp to the PicoCalc and fixing various problems. The autocomplete feature was contributed by @hasn0life.
Thanks to Alex at Clockwork Pi for donating a PicoCalc to enable me to create this port and write about it.