LCD character display
This example shows how to drive a LCD character display from uLisp:
LCD displays are a convenient low-cost way of displaying text for a project. These displays are typically based on the Hitachi HD44780 display driver [1], and are available in a variety of colours and formats, including 16 characters x 2 lines, 20 characters x 4 lines, 16 characters x 4 lines, and 8 characters x 2 lines. The displays include an analogue contrast adjustment signal, and most also include a backlight.
Using a backpack
One way of driving an LCD character display from uLisp is to buy an I2C/SPI backpack [2] which will allow you to drive it using with-i2c or with-spi. The advantage of this approach is that the display becomes an output stream, and you can write to it using any of the uLisp output commands, including print, princ, prin1, terpri, write-line, and write-string.
Driving the display directly
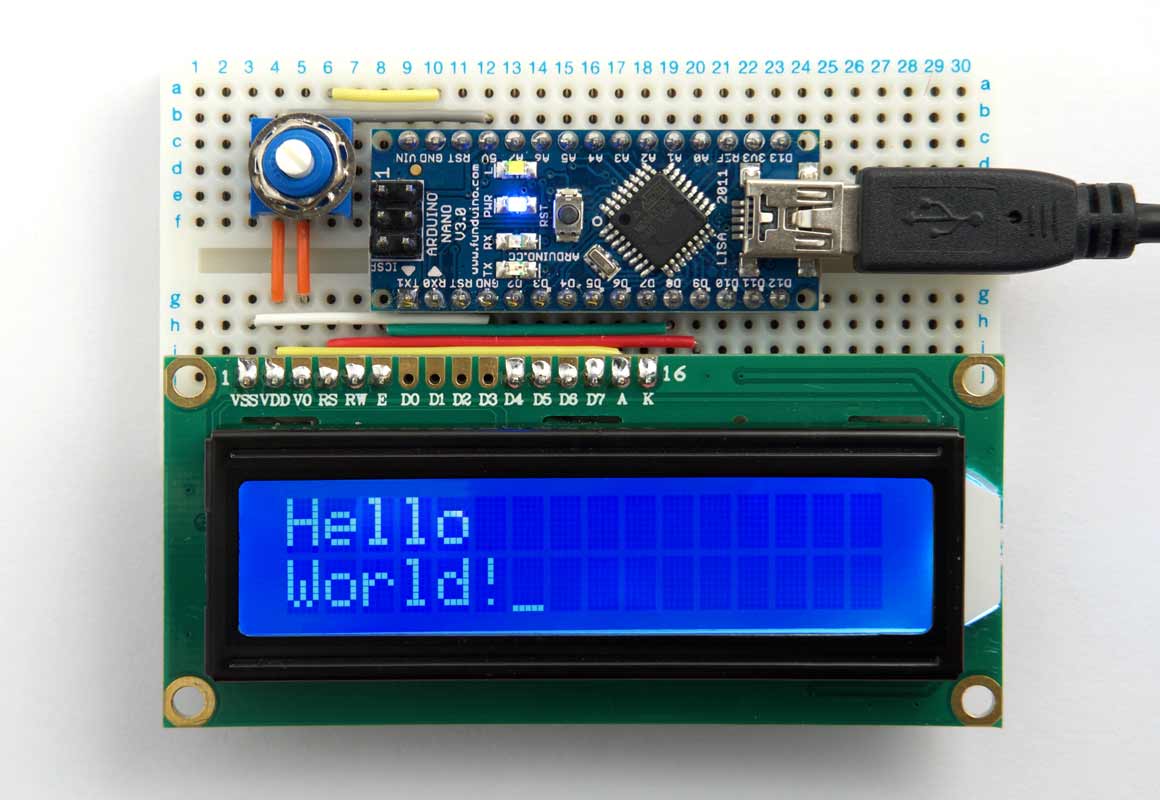
Alternatively you can drive the display directly using the following program. This will run on all the uLisp platforms, down to the Arduino Uno (or Arduino Nano as in the above photograph), although if it forms part of a larger project you'll probably need an Arduino Mega 2560 or better.
The following example is based on a 5V 16x2 LCD display [3].
Defining the pins
You need to connect six I/O lines from the Arduino to the display; four for the data lines D4 to D7, and two for the enable and RS lines:
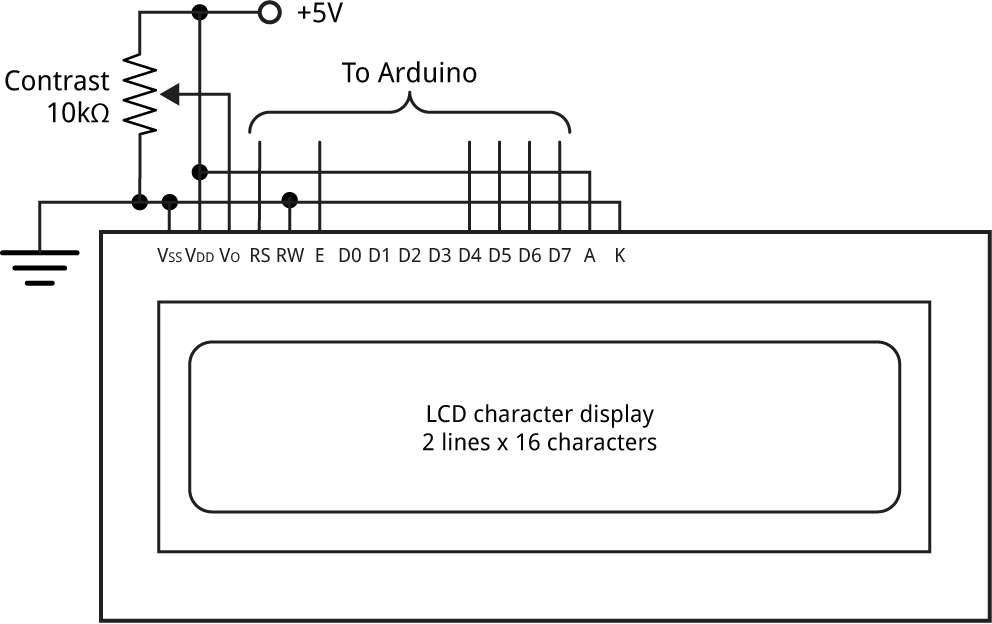
The pins you use should be specified by these variables:
; Arduino pins connected to D7 D6 D5 D4
(defvar dat '(5 4 3 2))

; Arduino pin connected to E and RS
(defvar en 8)
(defvar rs 9)
Tip: don't fit pin headers to the pins D0 to D3 on the display module; these aren't used, and leaving them unconnected may allow you to save some wiring between the Arduino board and the display module, as in my prototype in the photograph above.
Initialising the display
First the routine ini defines all the pins used by the display as outputs, and sends four commands to initialise the display:
(defun ini ()
  (mapc (lambda (x) (pinmode x t)) dat)
  (pinmode en t)
  (pinmode rs t)
  (cmd #x33)
  (cmd #x32)
  (cmd #x0e)
  (cmd #x01))
The commands are:
- #x33 and #x32 put the display into 4-bit mode.
- #x0e turns the display and cursor on. Change this to #x0c if you don't want a cursor.
- #x01 clears the display.
The first two commands are designed to work whether the display is initially in 8-bit or 4-bit mode, as follows.
If the display is initially in 8-bit mode, as it is after power-on, the first byte #x33 is interpreted as two commands:
#b0011xxxx, #b0011xxxx
where xxxx are the 'don't care' states of the lower-four data lines, D0 to D3. These leave the display in 8-bit mode.
If, however, the display is initially in 4-bit mode, as it would be if you just reset the Arduino, the first byte #x33 is interpreted as a single command:
#b00110011
which puts the display into 8-bit mode. In either case the second byte #x32 is interpreted in 8-bit mode as the two commands:
#b0011xxxx, #b0010xxxx
which put the display into 4-bit mode.
Sending data
The routine nib sends a four-bit nibble to the four data pins, and then pulses the enable pin:
(defun nib (n)
  (let ((sh -4))
    (mapc (lambda (x) (digitalwrite x (logand (ash n (incf sh)) 1))) dat)
    (digitalwrite en 1)
    (digitalwrite en 0)))
The routine byt calls nib twice to send a byte:
(defun byt (b)
  (nib (ash b -4))
  (nib (logand b #xf)))
The routine cmd calls byt to send one or more commands. The RS line is taken low for commands:
(defun cmd (c)
  (digitalwrite rs 0)
  (byt c)
  (digitalwrite rs 1))
Finally str sends a string to the display:
(defun str (s)
  (dotimes (i (length s))
    (byt (char-code (char s i)))))
To write Hello World! on the two lines of the display evaluate:
(str "Hello")
(cmd #xc0)
(str "World!")
The command #xc0 moves the cursor to the start of the second line.
Here's the whole program: Character LCD display program.
- ^ HD44780 datasheet on Sparkfun
- ^ I2C/SPI character LCD backpack on Adafruit.
- ^ 16x2 LCD Display White/Blue LED Backlight on HobbyTronics