I2C clock
This topic describes a digital clock written in uLisp running on an Arduino Uno. It demonstrates the use of uLisp's I2C interface, and the ability to run uLisp programs automatically on reset:
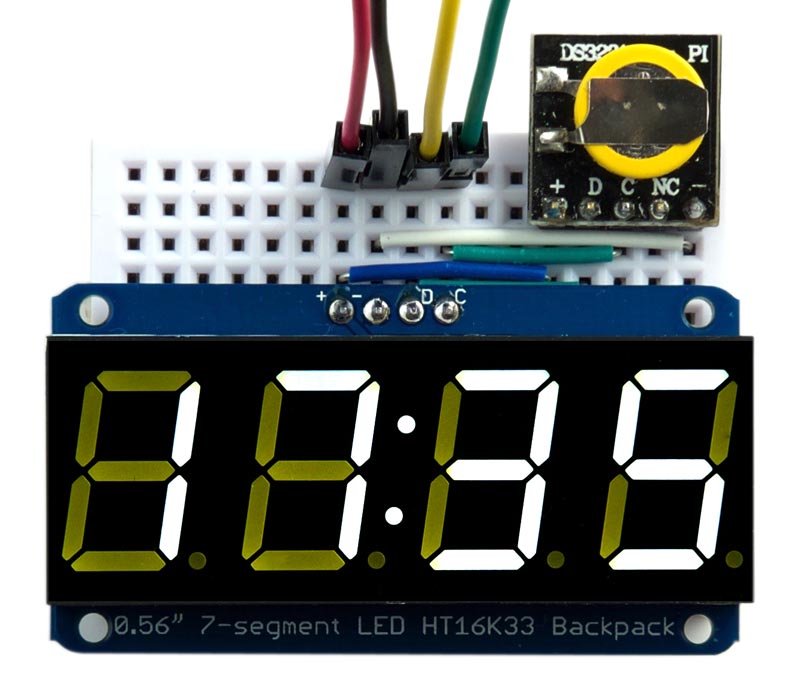
Clock for the Arduino Uno based on I2C display and RTC modules and programmed in uLisp.
The timekeeping is provided by an DS3231 RTC module [1], which is a low-cost, extremely accurate I2C real-time clock with an integrated temperature-compensated crystal oscillator. It also provides the date and two time of day alarms, although those features are not used in this application. Boards are available from several suppliers; I used one incorporating a backup battery from Seeed Studio [2], available from The Pi Hut in the UK [3]. Seeed also sell one using a supercapacitor to provide the backup supply.
For the display I used an I2C 7-segment display from Adafruit [4], available from Proto-Pic in the UK [5]. It's available in a range of colours.
The modules connect to the Arduino using four wires: Data to A4, Clock to A5, +5V, and Gnd. I used the default I2C address for each device; #x70 for the RTC, and #x68 for the display.
Setting the time
The following routine sets the time:
(defun set (hr min)
  (with-i2c (str #x68)
    (write-byte 0 str)
    (write-byte 0 str)
    (write-byte min str)
    (write-byte hr str)))
The first call to write-byte sets the starting register to write to in the DS3231; in this case 0, the seconds register. We then set the seconds to 0, the minutes to min, and the hours to hr. The times are defined in binary-coded decimal, so to set the time to 12:34 you need to evaluate:
(set #x12 #x34)
Once you have set the time the backup battery will keep the time correct in the DS3231, and so the set routine can be removed from memory on small platforms to save space:
(makunbound 'set)
The clock program
First we define the seven-segment display patterns for the digits 0 to 9:
(defvar seg '(#x3F #x06 #x5B #x4F #x66 #x6D #x7D #x07 #x7F #x6F))
Next the routine go initialises the display and sets the brightness to 1:
(defun go ()
  (with-i2c (str #x70)
    (write-byte #x21 str)
    (restart-i2c str)
    (write-byte #x81 str)
    (restart-i2c str)
    (write-byte #xe1 str)))
The last write-byte sets the brightness, which can be from #xe0 (off) to #xef (maximum).
Here's the routine show to display the time:
(defun show (hr min col)
  (with-i2c (str #x70)
    (write-byte 0 str)
    (dolist (c (list
                (nth (/ hr 16) seg)
                (nth (mod hr 16) seg)
                col
                (nth (/ min 16) seg)
                (nth (mod min 16) seg)))
      (write-byte c str)
      (write-byte 0 str))))
For each display digit you have to write two bytes to the display; this is for compatibility with Adafruit's other displays, and for this display the second byte is always zero. Curiously, there are effectively five digits, with the colon counted as the third digit, and to light it you have to write the value 2.
For example, to display 23:45 you can do:
(tim #x23 #x45 2)
Finally, here's the main clock program:
(defun clock ()
  (let ((col 2) hr min)
    (go)
    (loop
     ;; Read the time from the RTC
     (with-i2c (str #x68)
       (write-byte 1 str)
       (restart-i2c str 2)
       (setq min (read-byte str))
       (setq hr (read-byte str)))
     ;; Write the time to the display
     (show hr min col)
     ;; Flash the colon
     (setq col (- 2 col))
     (delay 1000))))
Making a stand-alone application
If you want the clock to run automatically when you connect power to the Arduino, save the image with:
(save-image 'clock)
You now have a stand-alone digital clock programmed in Lisp!
Here's the program in a single file: I2C clock program.
- ^ DS3231 Datasheet on Maxim Integrated.
- ^ Mini RTC Module on Seeed Studio.
- ^ Mini RTC Module for Raspberry Pi on The Pi Hut.
- ^ Adafruit 0.56" 4-Digit 7-Segment Display w/I2C Backpack on Adafruit.
- ^ Adafruit 0.56" 4-Digit 7-Segment Display w/I2C Backpack on Proto-Pic.