ESP32-S2, ESP-S3, and ESP-C3 boards
The Chinese company Espressif caught everyone's attention in 2014 with its low-cost Wi-Fi microcontroller module, the ESP8266. It followed this up two years later with the faster ESP32, which added Bluetooth and had lower power consumption. uLisp has supported the ESP8266 and ESP32 since Release 2.4, released in 2018.
Starting in 2019 Espressif have now launched no fewer than four successors to the base ESP32: the ESP32-S2, ESP32-C3, ESP32-S3, and ESP32-C6.
The ESP32 boards are supported by the ESP version of uLisp (even though the ESP32-C3 and ESP32-C6 use RISC-V processors).
Which board should I get?
The ESP32-S2 boards are currently the fastest of the ESP32 variants when used with uLisp; see Performance. The original ESP32 boards are also still a good choice.
I don’t currently recommend ESP32-S2, ESP32-C3, or ESP32-S3 boards that use the built-in USB interface (USB CDC) because of a problem that causes them to hang up if you upload a long Lisp program. The developers of the Arduino Core are aware of the problem and say they hope to fix it in a future release.
Update
25th February 2023: Updated descriptions to reflect the fact that Adafruit's ESP32-S2 boards now seem to work well with their own board options.
Boards
Specifications
The following table compares all the features appropriate to uLisp; this is based on a table created by Sirawit Moonrinta [1]:
| ESP8266 | ESP32 | ESP32-S2 | ESP32-C3 | ESP32-S3 | ESP32-C6 | |
| Released | Aug 2014 | Sept 2016 | Sept 2019 | Nov 2020 | Dec 2020 | April 2021 |
| MCU | Tensilica L106 | Tensilica LX6 | Tensilica LX7 | RISC-V | Tensilica LX7 | RISC-V |
| Speed | 160 MHz | 240 MHz | 240 MHz | 160 MHz | 240 MHz | 160 MHz |
| Cores | 1 | 1 or 2 | 1 | 1 | 2 | 1 |
| SRAM | 160 KB | 520 KB | 320 KB | 400 KB | 512 KB | 400 KB |
| Wi-Fi | Wi-Fi 4 up to 72.2 Mbps | Wi-Fi 4 | Wi-Fi 4 | Wi-Fi 4 | Wi-Fi 4 | Wi-Fi 6 |
| Bluetooth | No | BLE 4.2 | No | BLE 5.0 | BLE 5.0 | BLE 5.0 |
| SPI | 2 | 4 | 4 | 3 | ? | ? |
| I2C | 1 | 2 | 2 | 1 | 2 | ? |
| UART | 2 | 3 | 2 | 2 | ? | ? |
| USB | No | No | USB | USB | USB | ? |
| ADC | 1 x 10-bit | 2 x 8-bit | 2 x 8-bit | No | ? | No |
| DAC | No | 2 x 8-bit | 2 x 8-bit | No | ? | No |
| Benchmark | 14.3 s (UART) | 8.0 s (UART) | 5.7 s (UART) 2.7 s (USB) |
7.8 s (UART) | 6.1 s (UART) | ? |
The benchmark is the time taken to calculate the recursive integer function (tak 18 12 6); see Benchmarks. For MCUs that support USB Serial I give the times using both the UART and the built-in USB Serial; I'm mystified by the huge difference in these times.
Highlights
The key highlights of these differences are:
- The ESP32-S2, ESP32-C3, and ESP32-S3 have native USB, which means that boards can be designed without needing a separate USB-to-Serial chip.
- The ESP32-C3 is based on a RISC-V processor, making it a lower cost option.
- The ESP32-S3 is an updated ESP32, offering the same features but with higher specifications.
Several manufacturers have made boards based on the ESP32-S2, and here I've reviewed a selection of six different ones that I can recommend for use with uLisp.
General features
LittleFS and save-image
The ESP32 version of uLisp now uses LittleFS to allow you to save the entire workspace on all ESP32 boards using (save-image).
The first time you call save-image LittleFS allocates the file system, and an error may be diplayed such as:
./components/esp_littlefs/src/littlefs/lfs.c:1071:error: Corrupted dir pair at {0x0, 0x1}
E (62578) esp_littlefs: mount failed,  (-84)
E (62579) esp_littlefs: Failed to initialize LittleFS
It should subsequently work without error.
Wi-Fi
All these boards support Wi-Fi. For examples of using the Wi-Fi features see Wi-Fi examples, and for reference information see Wi-Fi extensions.
Using the register command
As of Version 4.1 of uLisp you can access the ESP32 registers directly with the register command.
On the ESP32-S2 there are 43 GPIO pins: 0-21 and 26-46. A GPIO Matrix allows you to route any pin to a specified signal within the processor. However, for simple GPIO input and output there are direct ways of accessing or controlling the pins, which is what the following example uses [2]:
Simple GPIO output
The GPIO Matrix can also be used for simple GPIO output. Setting a bit in the GPIO_OUT register will write to the corresponding GPIO pad, where its address is given by:
(defvar gpio-base #x3F404000)
(defvar gpio-out (+ gpio-base #x0004))
To configure a pin for simple GPIO output you need to set the GPIO Matrix GPIO_FUNCx_OUT_SELregister to the special peripheral index value #x100. The following function gpio-func-out-sel returns the correct address for this register for pin n, where n is 0 to 39:
(defun gpio-func-out-sel (n) (+ gpio-base #x0554 (* 4 n)))
You also need to set the appropriate bit in the GPIO_ENABLE register, given by:
(defvar gpio-enable (+ gpio-base #x0020))
For example, the Adafruit ESP32-S2 Feather has an LED connected to GPIO pin 13. The following program configures this pin and then flashes the LED:
(defun flash ()
  (register (gpio-func-out-sel 13) #x100) ; simple output
  (register gpio-enable (ash 1 13)) ; enable output
  (loop
   (register gpio-out (logxor (register gpio-out) (ash 1 13)))
   (delay 1000)))
ESP32-S2-Saola-1 WROVER
The ESP-S2-Saola-1 WROVER is Espressif's official development board based on the ESP32-S2-WROVER module. It uses a CP2102 USB-to-Serial chip for the serial interface:
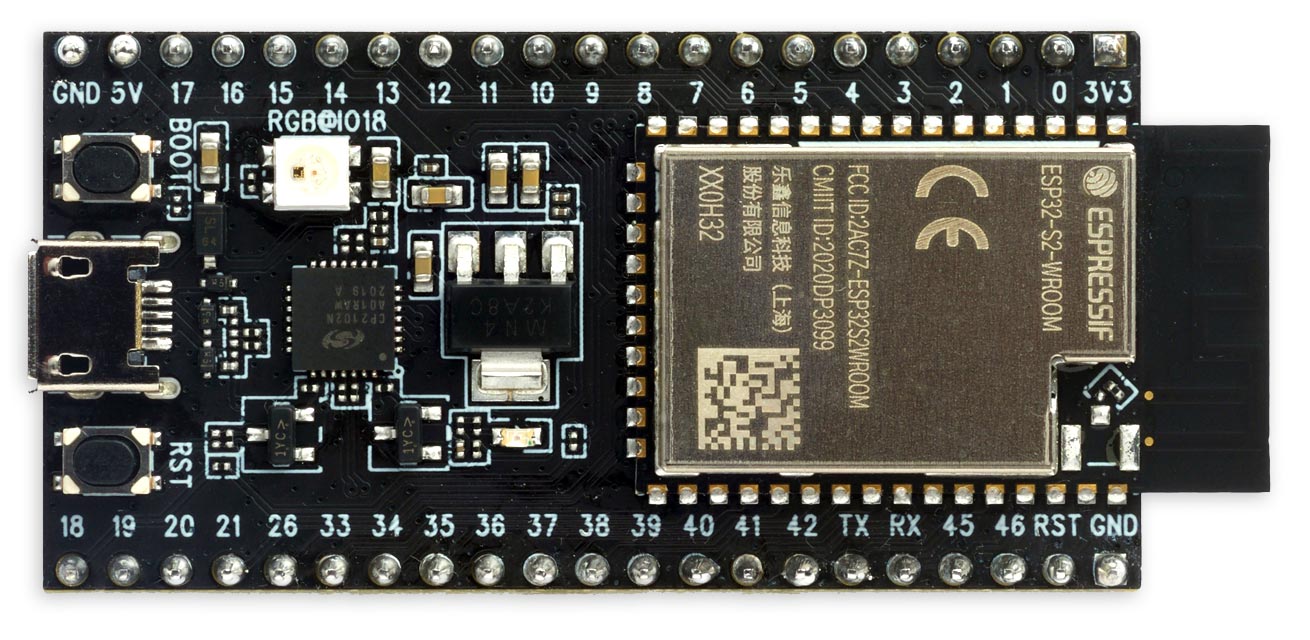
It has 4 Mbytes of SPI flash and 2 Mbytes of PSRAM. The latest release of uLisp allows you to use the PSRAM for the Lisp workspace, giving a workspace of 260000 objects.
Installing uLisp from the Arduino IDE
- Install the ESP32 Arduino core version 2.0.3 or later.
- Select ESP32 Arduino from the Board menu.
- Select the ESP32S2 Dev Module board option.
- Set PSRAM to Enabled.
You can leave the other options at their defaults.
WROOM
An alternative version of this board is available with a WROOM module which does not have PSRAM.
Native USB
The ESP32-S2 supports native USB. To use this you need to wire D19 and D20 to the D- and D+ connections of a USB socket or cable, and upload uLisp with the USB CDC On Boot option set to Enabled.
Adafruit ESP32-S2 Feather
The Adafruit ESP32-S2 Feather [3] adopts the same format as Adafruit's other Feather boards, making it compatible with a number of their Feather wings:
It has a USB-C connector, and uses the ESP32-S2's native USB, avoiding the need for a UART chip.
It provides 4 MB flash and 2 MB PSRAM, and includes a JST connector for a Lipo battery, a Lipo charger to allow the battery to be charged from the USB port, and an I2C LC709203 battery monitor chip. The board also has a QWIIC/STEMMA QT connector for connecting I2C modules.
A version is also available with an integrated BME280 temperature/humidity/pressure sensor.
For information about the I/O pins and interfaces see: Adafruit ESP32-S2 Feather Pinouts.
Installing uLisp from the Arduino IDE
- Install the ESP32 Arduino core version 2.0.5 or later.
- Select ESP32 Arduino from the Board menu.
- Select the Adafruit Feather ESP32-S2 board option.
- Set Partition Scheme to Default 4MB with spiffs, otherwise you won't be able to use save-image.
You can leave the other options at their defaults.
LEDs
As with other Feather boards the ESP32-S2 Feather has a red LED connected to the digital pin 13 which you can flash with the following program:
(defun blink (&optional x)
  (pinmode :led-builtin t)
  (digitalwrite :led-builtin x)
  (delay 1000)
  (blink (not x)))
Run it by typing:
(blink)
Exit by entering ~.
Adafruit QT Py ESP32-S2
The Adafruit ESP32-S2 QT Py [4] adopts the same compact format as their other QT Py boards:
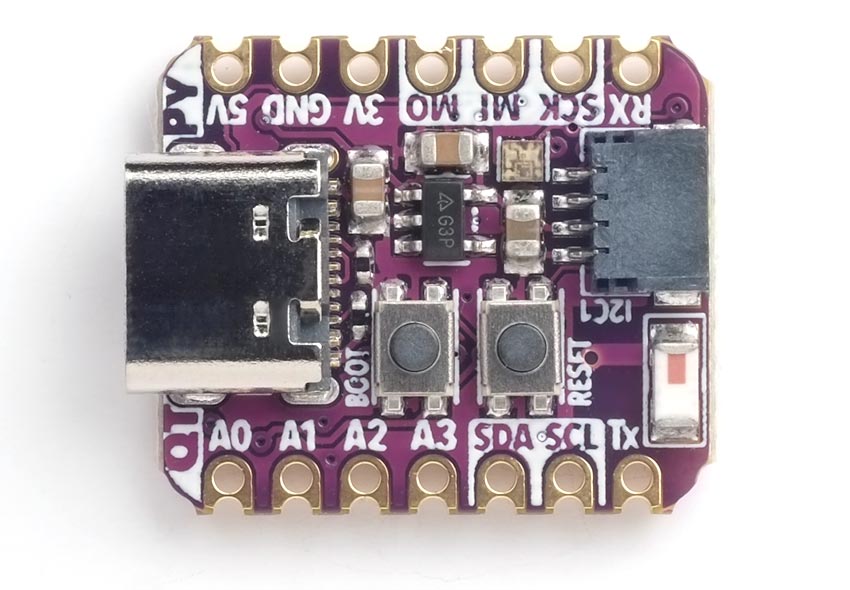
It has a USB-C connector, and uses the ESP32-S2's native USB, avoiding the need for a UART chip. It provides 4 MB flash and 2 MB PSRAM.
Installing uLisp from the Arduino IDE
- Install the ESP32 Arduino core version 2.0.5 or later.
- Select ESP32 Arduino from the Board menu.
- Select the Adafruit QT Py ESP32-S2 board option.
- Set Partition Scheme to Default 4MB with spiffs, otherwise you won't be able to use save-image.
You can leave the other options at their defaults.
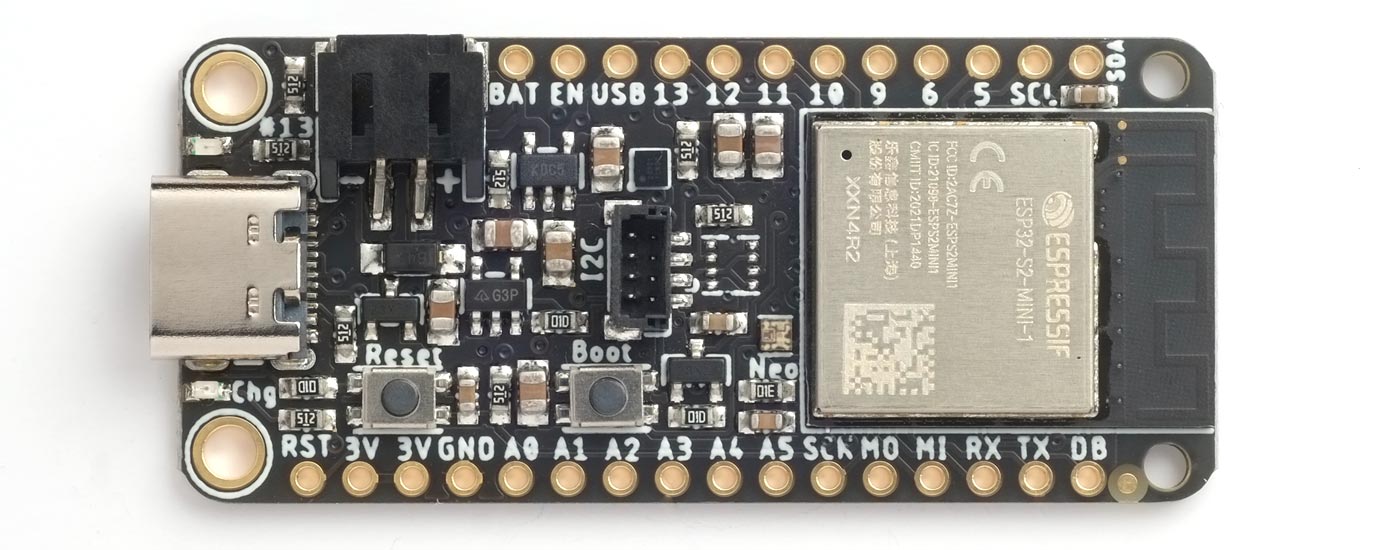
Unexpected Maker Feather S2
Another Feather-format board is the Feather S2 from Unexpected Maker [5]:
It has a USB-C connector, and uses the ESP32-S2's native USB, avoiding the need for a UART chip. It provides 16 MB flash and 8 MB PSRAM. Like the Adafruit board it includes a JST connector for a Lipo battery, and a Lipo charger to allow the battery to be charged from the USB port.
The board includes Power (red), Charge (orange), and pin 13 (blue) LEDs, an APA102 RGB LED which is easy to drive from uLisp, and an ALS-PT19 Ambient Light Sensor which you can read on an analogue input.
The board has a QWIIC/STEMMA QT connector for connecting I2C modules.
Installing uLisp from the Arduino IDE
- Install the ESP32 Arduino core version 2.0.3 or later.
- Select ESP32 Arduino from the Board menu.
- Select the UM FeatherS2 board option.
- Set Partition Scheme to Default 4MB with spiffs (1.2MB APP/1.5MB SPIFFS), otherwise you won't be able to use save-image.
You can leave the other options at their defaults.
LEDs
As with other Feather boards the UM FeatherS2 has a blue LED connected to the digital pin 13 which you can flash with the following program:
(defun blink (&optional x)
  (pinmode :led-builtin t)
  (digitalwrite :led-builtin x)
  (delay 1000)
  (blink (not x)))
Run it by typing:
(blink)
Exit by entering ~.
Ambient Light Sensor
The ALS-PT19 Ambient Light Sensor is on Arduino pin 14, so you can print its value with the following program:
(loop (print (analogread 14)) (delay 1000))
ESP32-C3-DevKitM-1
This is Espressif's official DevKit board for the RISC-V ESP32-C3 based on the ESP32-C3-MINI-1 module [6]. It uses a CP2102 USB-to-Serial chip for the serial interface, so doesn't take advantage of the ESP-C3's built-in USB interface:
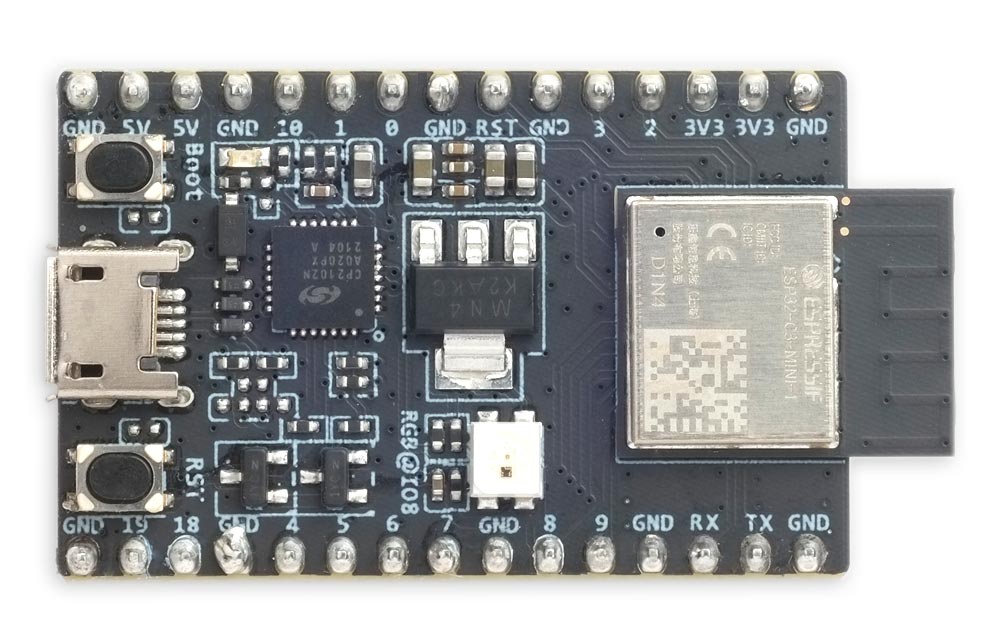
It provides 4 Mbytes of SPI flash, but no PSRAM.
Installing uLisp from the Arduino IDE
- Install the ESP32 Arduino core version 2.0.3 or later.
- Select ESP32 Arduino from the Board menu.
- Select the ESP32C3 Dev Module board option.
You can leave the other options at their defaults.
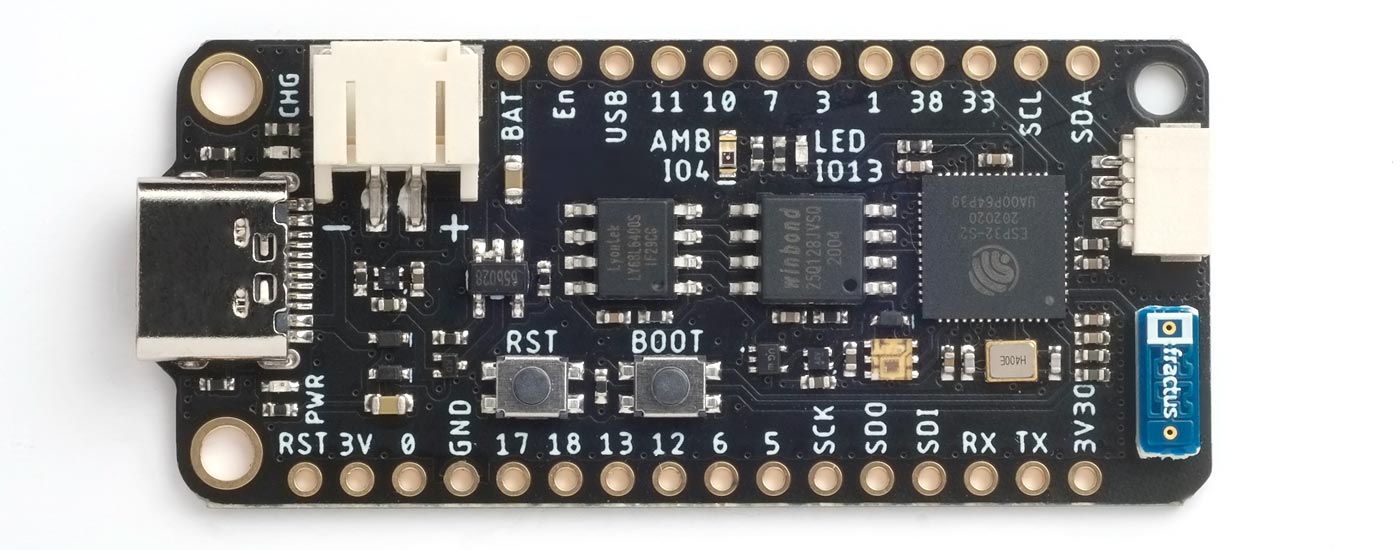
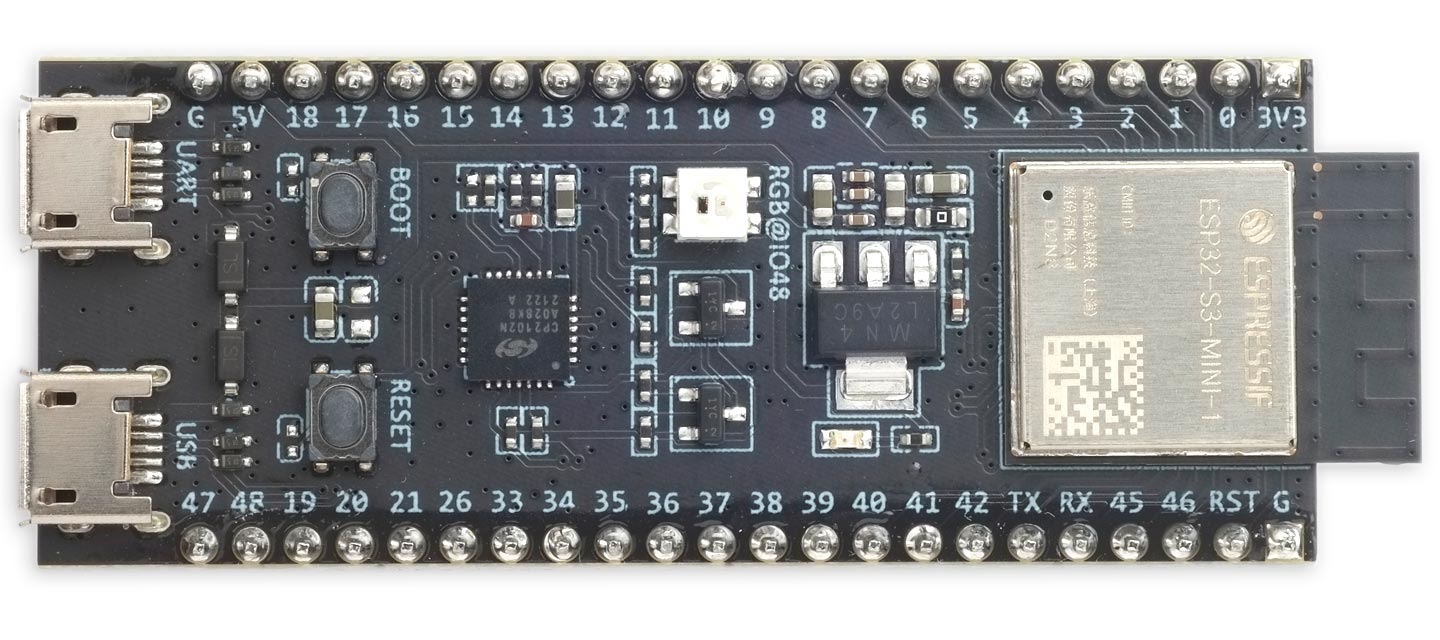
ESP32-S3-DevKitM-1
This is Espressif's official DevKit board for the ESP32-S3 based on the ESP32-S3-MINI-1 module [7]. It provides 8 Mbytes of flash and no PSRAM. A variety of other S3 boards are also available with the options of 32 Mbytes of flash, and 2 Mbytes or 8 Mbytes of PSRAM.
The DevKit S3 boards have two USB connections: the one labelled UART uses a CP2102 USB-to-Serial chip for the serial interface, and the one labelled USB connects to the ESP32-S3's built-in USB interface:
Installing uLisp from the Arduino IDE
With the current ESP32 Arduino core there's a problem using the built-in USB interface, so I recommend only using the UART connection:
- Install the ESP32 Arduino core version 2.0.3 or later.
- Connect your computer to the USB connection labelled UART.
- Select ESP32 Arduino from the Board menu.
- Select the ESP32S3 Dev Module board option.
- Set USB CDC On Boot to Disabled to use the UART.
You can leave the other options at their defaults.
- ^ Comparison Espressif ESP MCUs on GitHub.
- ^ ESP32-S2 Technical Reference Manual on Espressif.com.
- ^ Adafruit ESP32-S2 Feather Board on Adafruit.
- ^ Adafruit QT Py ESP32-S2 Board on Adafruit.
- ^ FeatherS2 - ESP32-S2 on Unexpected Maker.
- ^ ESP32-C3-DevKitM-1 Development Board on The Pi Hut.
- ^ ESP-S3-DevKitM-1 on Adafruit.